Linking PowerSchool to SQL Server
This rather longish document outlines a couple of important steps in configuring your KIPP Silo instance. It is primarily aimed at setting up a linked server (specifically PowerSchools Oracle back-end) on MS SQL Server. It also covers in passing
- how to connect to your EC2 instance;
- setting up a VPN for Person-hosted PowerSchool
- creating a new database in SQL Server
- creating a new user in SQL Server and allowing that user access to a database.
- Allowing local access to your database.
Disclaimer: These direction are long and I hope detailed enough to get anyone through this process in about 30 mins. However, I am not a DBA and there’s a better than likely chance that I’ve neglected to include a step. Try going through them. Let me know where you have trouble and I’ll update this doc!
- Pre-reqs
- Get F5 Big-IP Edge Client
- Get Java
- Get Oracle Client software
- Create KIPP Silo Database
- Link to PowerSchool
- Accessing your SQL Server Instance (and linked databases like PowerSchool) from outside of SQL Server Management Studio
Pre-reqs
Once you’ve logged into your Windows Server Desktop, you might want to get some other software you are already likely using.
Wait! You haven’t connected to your AWS EC2 Windows Server 2012 server yet? AWS makes it easy: login to AWS, navigate to your EC2 instances, check your KIPP Silo instance and then click the Connect button at the top of the page.
So back to setting up For example, the first thing I did was fire up IE so I could go and get Chrome. Once I installed and launched Chrome, I signed in with my google credentials, which caused all of my bookmarks, extensions, and history to populate my new copy of Chrome. And here’s some links to some other software that I like to use that:
- Text Editors (you will need something like this)
- Sublime Text 2
- LightTable: This is pretty cool text editor that allows for line-by-line evalu ation of code in scripts. It’s pretty bleeding-edge so YMMV.
- Programming languages and Integrated Development Environments
- Python 2.7.8
- R
- RStudio: this is an excellent IDE for R.
Get F5 Big-IP Edge Client
If you have a PowerSource account with Pearson you get it by searching for article #70601:
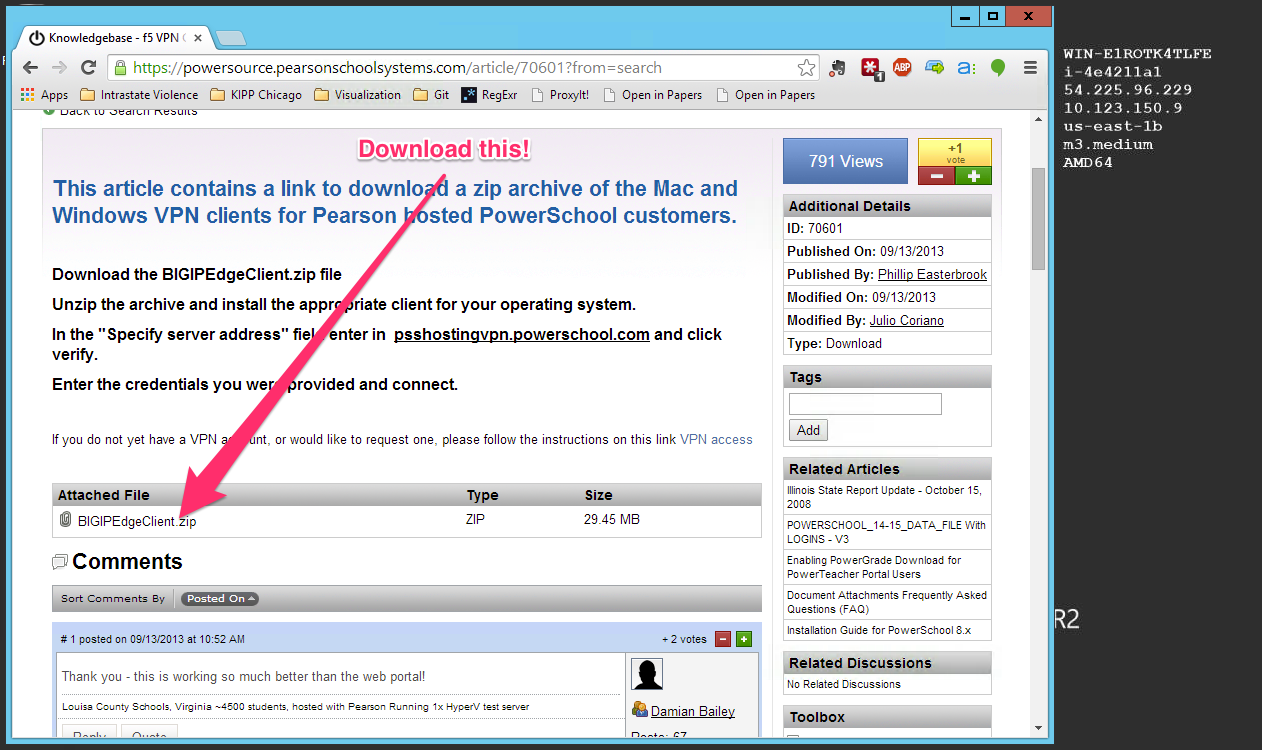
You definitely need the F5 VPN client if your PowerSchool instance is Pearson-hosted. You’ll need to use your VPN credentials, which you can get from Pearson by calling support if you don’t know what it is. If you use another provider for hosting or self-host your PowerSchool instance then you’ll want to talk to your IT staff.
Get Java
Use the Verify Java page to install the lastest version of Java.
You’ll also need a Java Developer Kit (JDK). You get that here!
Get Oracle Client software
You need to install the correct Oracle drivers. You want the latest version of the Oracle Data Access Components (ODAC), and you want the XCopy deployment. They are available here:
64-bit Oracle Data Access Components (ODAC) Downloads
Once you download and unzip this into a folder, you need to run the following command from a terminal emulator (like PowerShell) in that folder:
C:\Users\Administrators\Downloads\ODAC121010Xcopy_x64>.\install.bat
	oledb c:\oracle\odac64 odac64 true
Then you need to add two folders to your system path (here’s how you do this):
c:\oracle\odac64and
c:\oracle\odac64\binNext you need to reboot your system. Click the Start button in the lower left hand corner of you screen (it looks like an abstract 4-pane window viewed at an angle), which brings up the “Start page”. Click on the power icon in the upper right hand corner of the screen. Select Restart. Twiddle your thumbs.
Create KIPP Silo Database
Create the DB
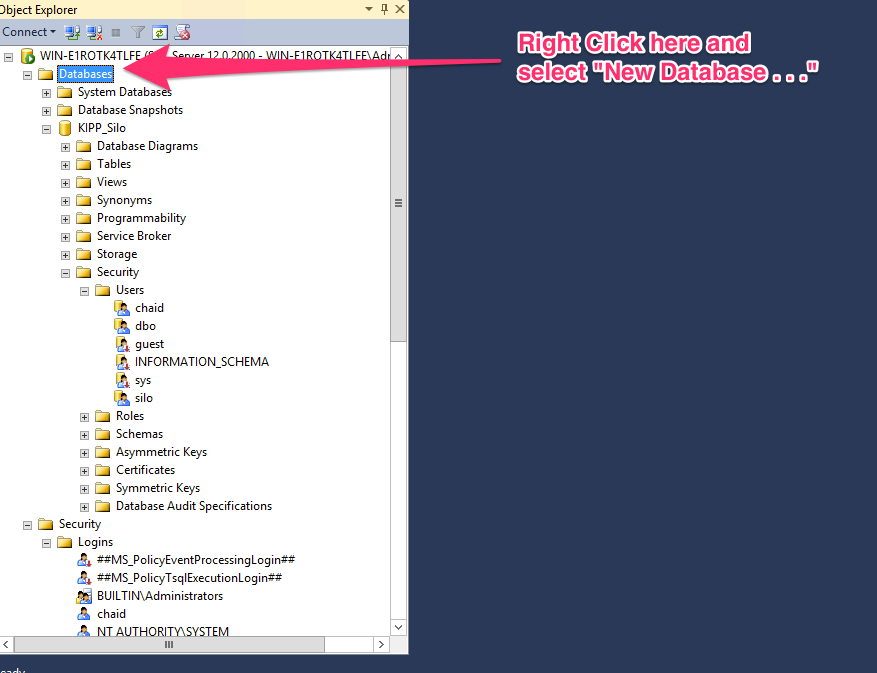
Open up Microsoft SQL Server Management Studio. Creating a new database is really super simple. Right click on Databases in the left-hand navigation pane and select New Database…:
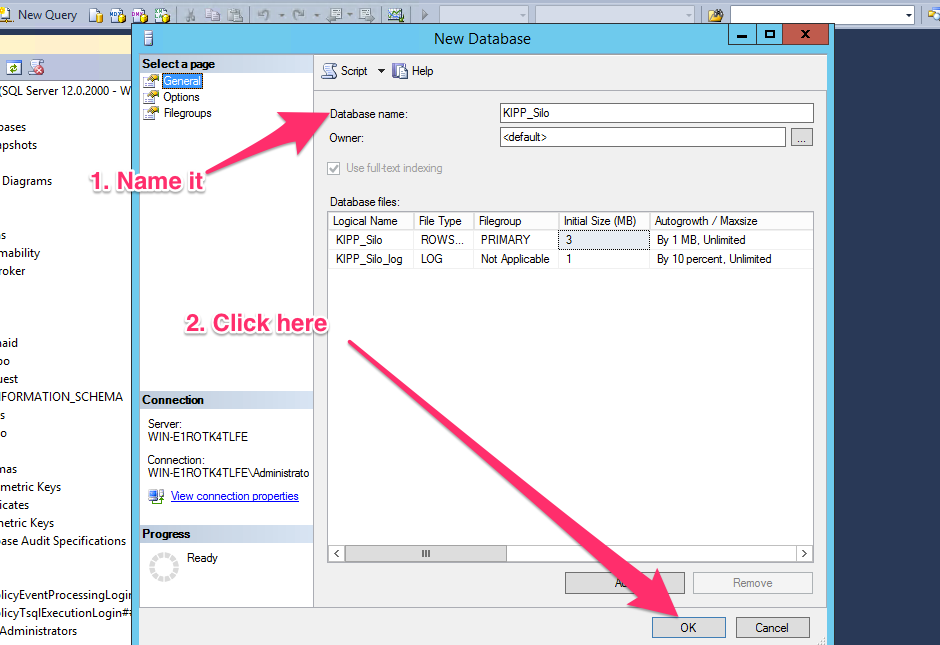
Now give it a name (KIPP_Silo, perhaps?) and click OK.
Create a database user
In order to link to your own SQL Server instance from outside of SQL Server Management Studio (i.e., from a R or Python script that manages your ST Math roster or something), you’ll need to create a user and assign that user to a database:
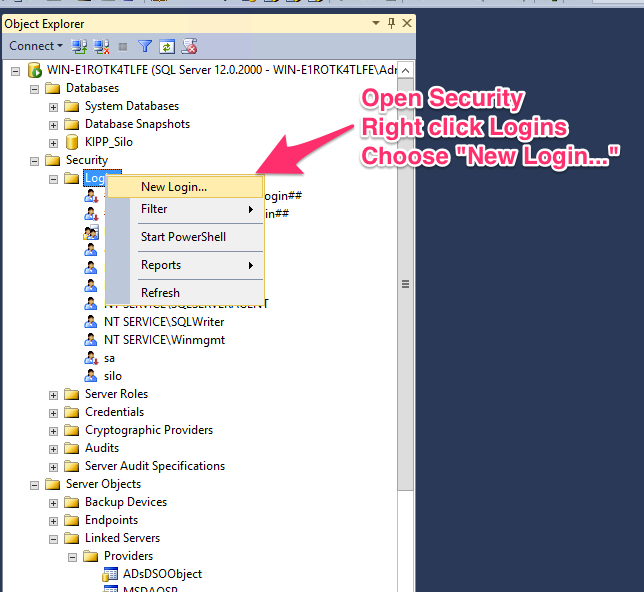
Now give the new user a name (say, “silo”), click the radio button for SQL Server authentication and give that user a password.
Uncheck the “Enforce password expiration”.
Select “KIPP_Silo” (or whatever you named the DB above) in the Default Database dropdown.
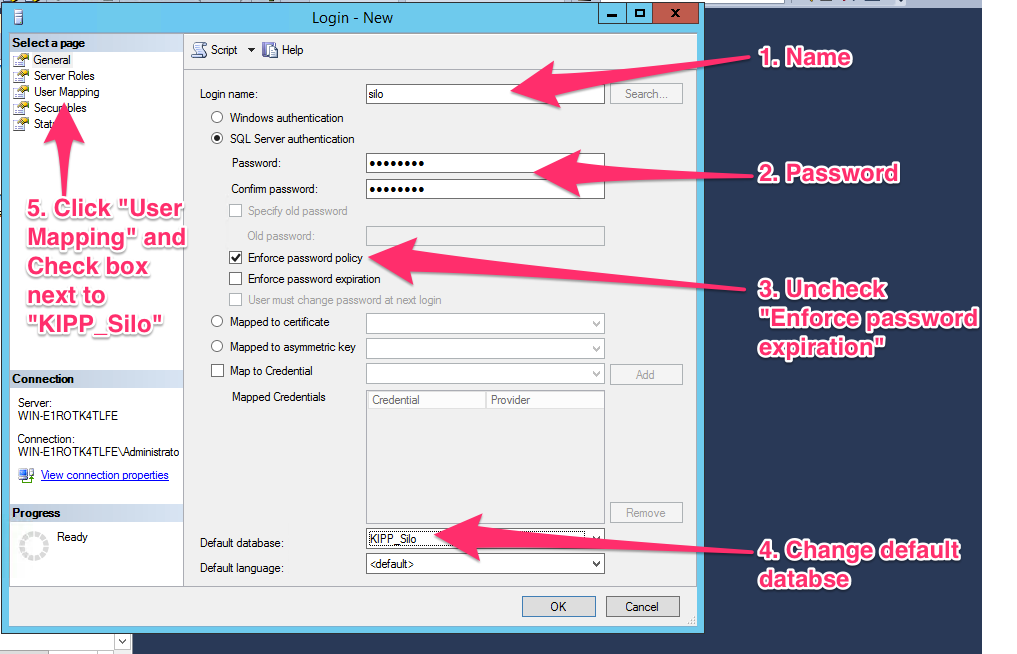
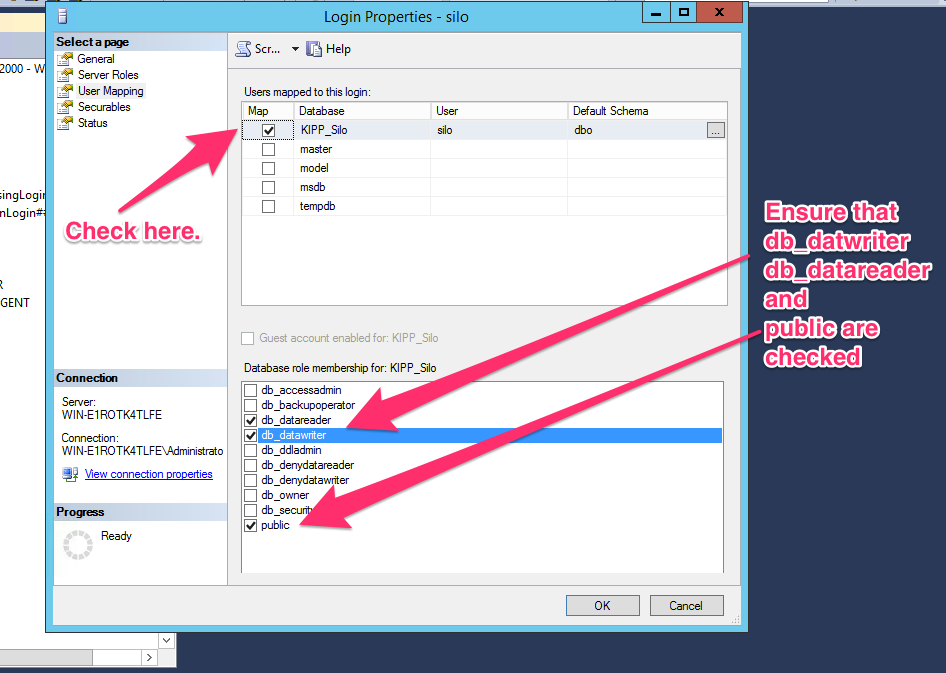
Click on User Mapping under Select a page. Click the checkbox next to ‘KIPP_Silo’ and ensure that the checkboxes next to db_datawriter, db_datareader, and public are checked. Click OK.
Link to PowerSchool
Ok. Now you need to set some parameters for the linked server provider (i.e., the software you downloaded from Oracle above that manages the connection to Oracle database that is the backbone of your PowerSchool instance).
You first must configure the Oracle OleDB provider (ORAOLEDB.Oracle) to run inside the SQL Server process and then configure it to accept parameters. There are two ways to do this: one with the SQL Server Management Studio GUI interface and another by firing off some stored procedures. You need only to done of these approaches
Provider options: GUI Approach
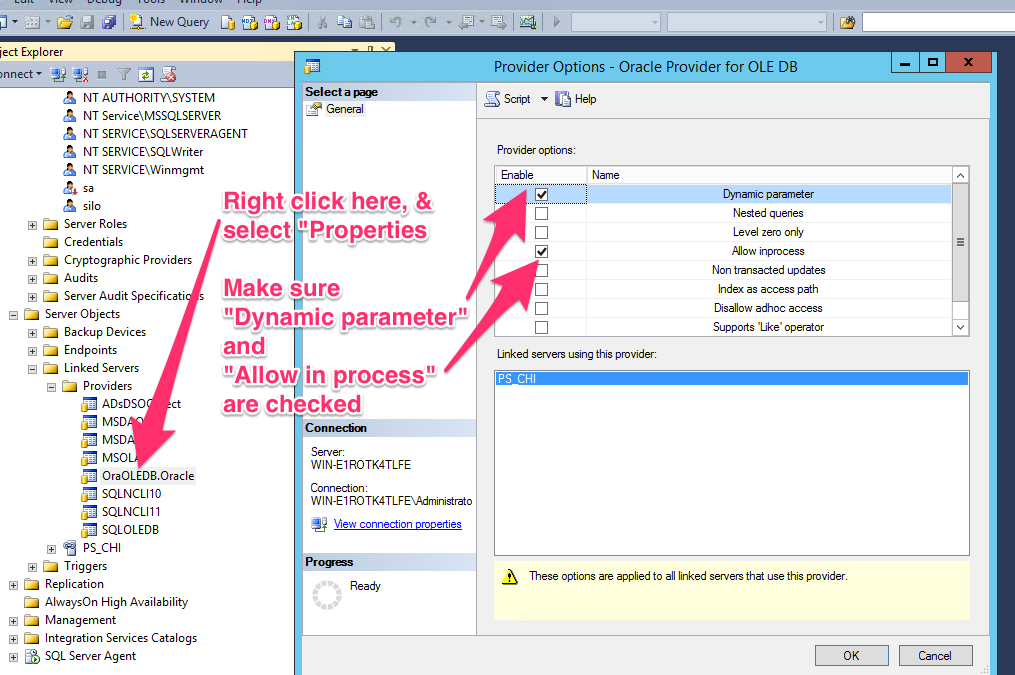
It’s pretty straighforward to use the GUI. In Management Studio’s left-hand navigation pane expand Server Objects, then expand Linked Servers, and then expand Providers. Right click on ORAOLEDB.Oracle and select Properties, which will open Oracle Provider for OLE DB Provider options dialog. Ensure that check boxes are ticked to enable Dynamic parameters and Allow inprocess. Click OK.
Provider options: Stored Procedure Approach
Alternatively, run these two stored procedures in the Managment Studio console:
exec master.dbo.sp_MSset_oledb_prop 'ORAOLEDB.Oracle', N'AllowInProcess', 1

exec master.dbo.sp_MSset_oledb_prop 'ORAOLEDB.Oracle', N'DynamicParameters', 1
Actually Linking the Server
Ok, we are near the end here!!! You’ll need your PowerSchool instances IP address, instance name (usually something like VA038, which is the state you are in followed by 3 integers).
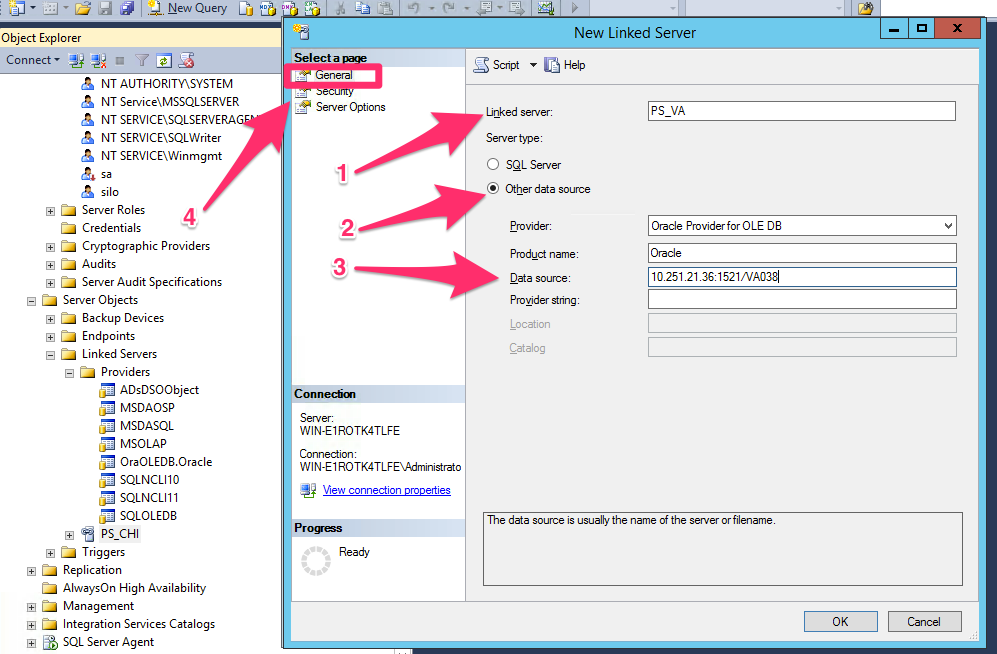
In the left hand navigation of Management Studio right-click Linked Servers and select “New Linked Server…”, which opens the New Linked Server dialogue. Under the General Page put the name of your soon-to-be-linked server in the text box next “Linked server:” (in Chicago we us ‘PS_CHI’ and KIPP NJ (née Team) uses ‘PS_TEAM’).
Under Server type: select “Other data source” and select Oracle Provider for OLE DB. Fill in “Oracle” for Product name, and the data source string (written IP_Address:1521/InstanceID, see figure below for an example). Leave Provider string: blank.
Now click on Security under Select page in the same dialogue box. Under the For a login not defined in the list above, connections will prompt select the Be made using this security context choice. Fill in your Remote login: (usually ‘PSNAVIGATOR’) and your password for that user. Click OK
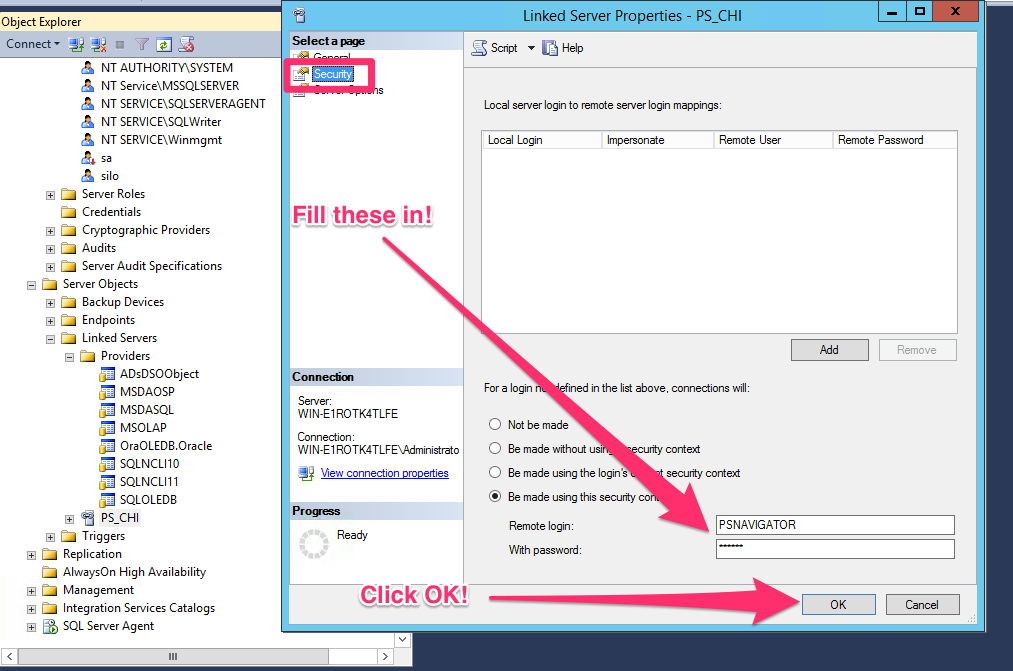
You should, if all goes well, have a connected Server. You can run the following bit of SQL as a quick test:
SELECT	*
FROM	OPENQUERY(PS_CHI,
		  'SELECT  *
		   FROM students'
		  )
Accessing your SQL Server Instance (and linked databases like PowerSchool) from outside of SQL Server Management Studio
So we went through this rigmarole of setting up a user on the KIPP_Silo database. Why? Because we will use that user to access the database (and any linked databases therein) from outside to SQL Server Management Studio (which automagically connects to your SQL Server Database). This is especially important if you will want to access your data from Python or R script to load your data from outside applications (ST Math, i-Ready, Kickboard, etc.) into the database, do any statistical analysis, or create and maintain roster integrations. So it is pretty important.
If you’ve done nothing to your DB since spinning up the Windows Server EC2 instance, then your instance is pretty locked down and hard to access. The following steps will open it to applications running on the same instance (i.e., on the same Windows Server computer, but not to the public internet). So let’s open it up a bit.
Click on the Start button, then on the Start Page click the downward pointing arrow in a circle. Select SQL Server 2014 Configuration Manager:

Expand SQL Server Network Configuration and click on *Protocols for MSSQLSERVER.
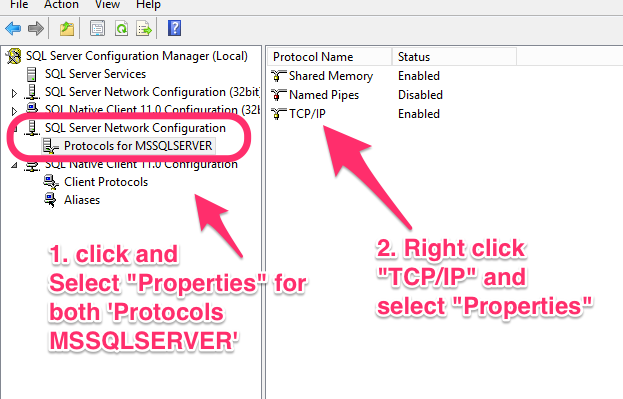
Right-click on TCP/IP and select Properties. Click on the IP Addresses tab. Scroll down to IP4 and verify that is for your local hose (127.0.0.1). Set the Active and Enabled properties to YES.
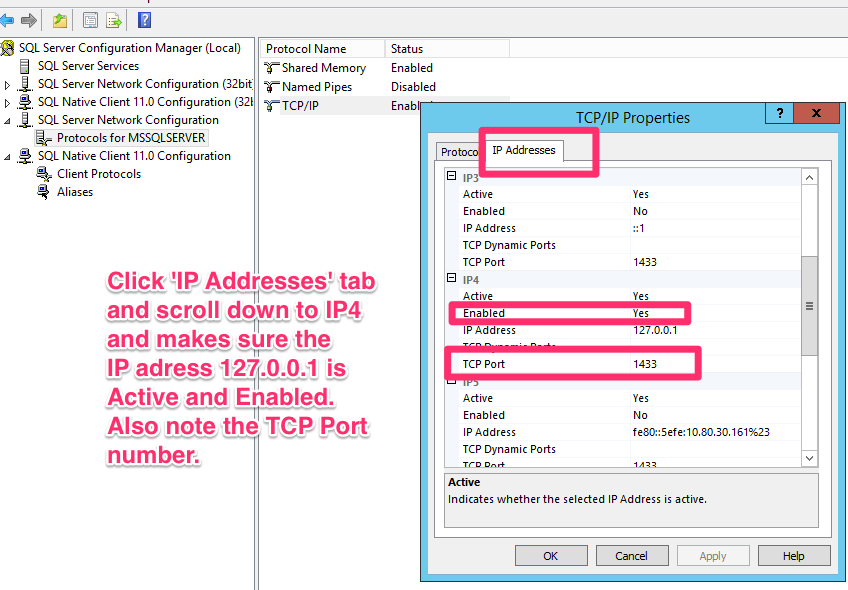
Click on the Protocol tab and verify Enabled and Listen All are set to Yes. Click OK.
Finally, restart your SQL Server Services. In the left-hand navigation pane click on SQL Server Services, then right click on SQL Server (MSSQLSERVER) and select Restart.
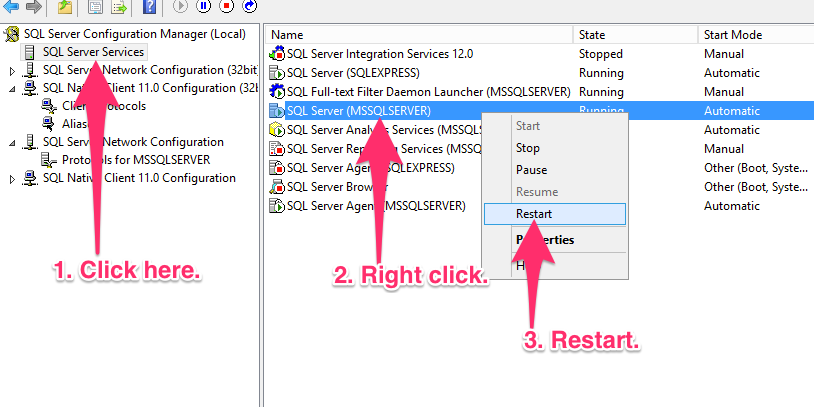
That’s it. You should now have a SQL Server instance that be accessed locally by your own scripts and a clear view of your linked PowerSchool Instance.
Again, these directions/this documentation is long and I may have left out some crucial step. So if you run into any problems just let me know.