Setting up SQL Server on AWS
This step-by-step tutorial covers the process for launching your own version of the KIPP Silo data warehouse on Amazon Web Services. Note: I’ve never done this before. Like ever. In other words this is my first time doing this ever and I’m documenting here so that (i) big KIPPsters that haven’t done this before can see how it can be done and (ii) any mistakes I make are documented and someone—anyone—can correct them.
It will cover how to launch an EC2 instance with Windows Server as your operating system and SQL Server as the database that will serve as your KIPP Silo data warehouse. Note that these instructions are good for the day they were written. If you are reading them sometime down the road they might not accurately reflect your current state of the world/SQL Server/Windows Server/AWS/etc.
Table of Contents
- Amazon Web Services
- This seems a all a bit overwhelming and maybe even a little scary, what should I do?
- Next Steps
Amazon Web Services
First, you’ll need to go to Amazon Web Services and click on sign up:
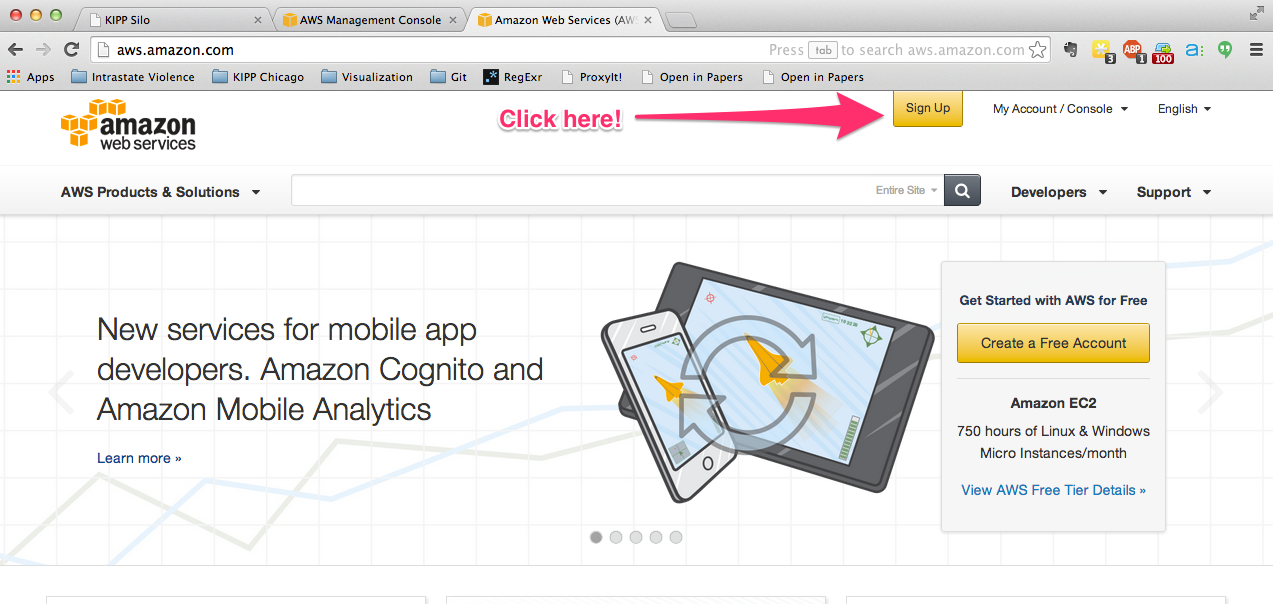
Go through the sign up process and then you will find your self at the AWS Managment Console. This is where you will launch an EC2 instance, which is to say an Elastic Compute web server hosted and maintained by your favorite purveyor of books and dry goods. But don’t worry, they are crack experts at hosting stuff for you in The Cloud.
You will see a bunch of color coded and coordinated icons for different AWS services. The second one in orange on the left says EC2. That’s the one you want. Click it!
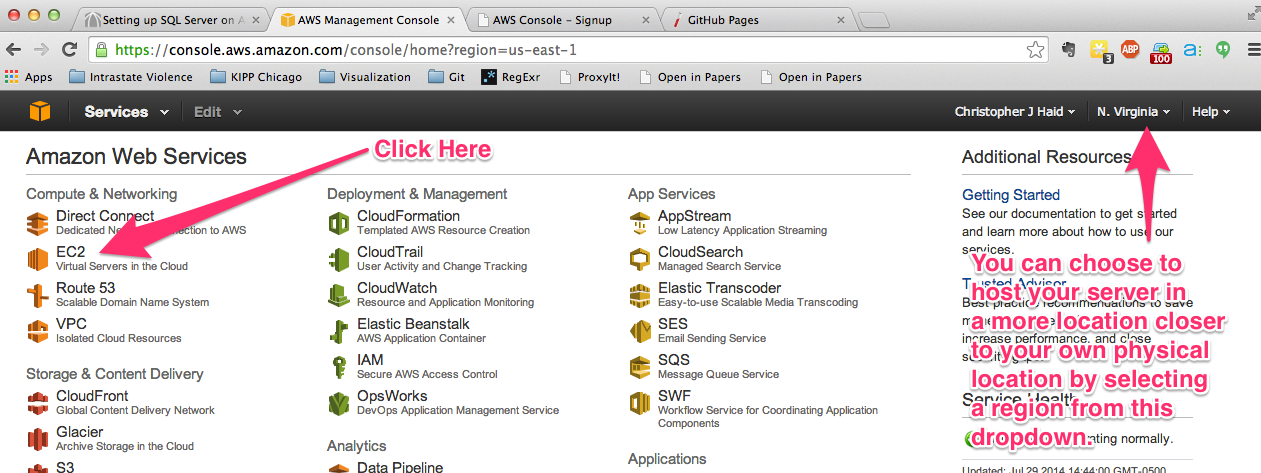
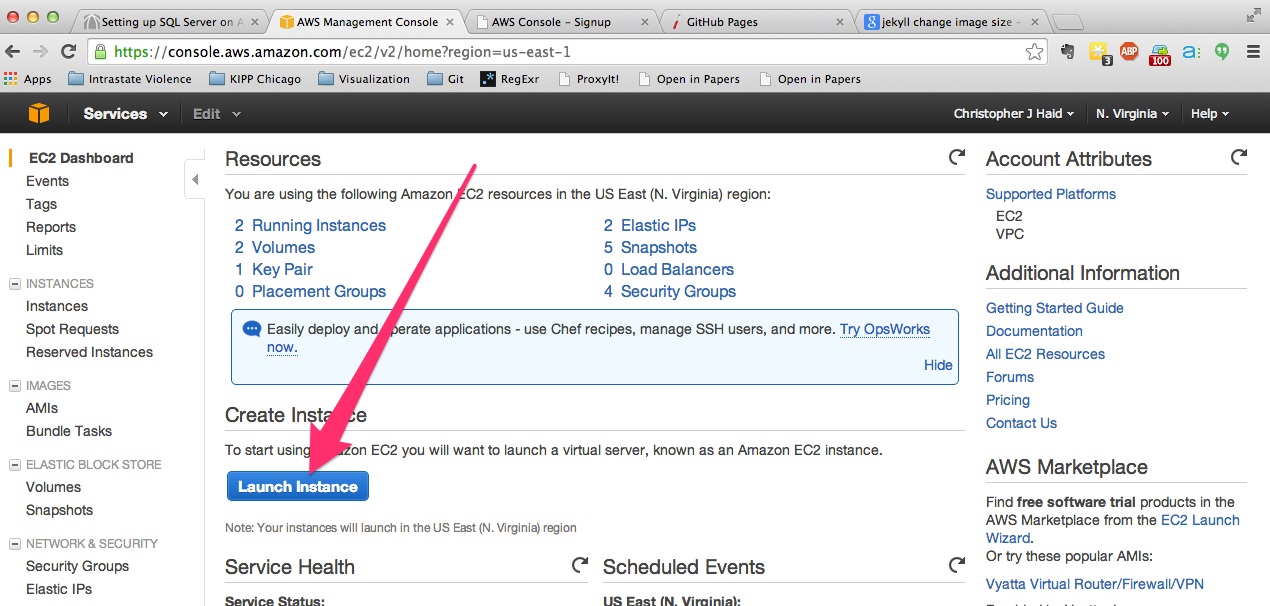
This brings your the EC2 Dashboard. This is were you manage all your different EC2 instances. If this is your first time launching an EC2 instance, then you’ll see lots of zeros and not much of any thing else.
To orient you to the console you’ll see that as of this writing KIPP Chicago has two running instances under the Resources section. They both support our data analysis and interactive reporting website: one instance is relatively powerful machine that we use for production and the other is the development server. There is an IP address for each and each has its own storage. And we have one key pair, which is how we securely access these machines (at least the first time we do so).
The important part of this screen for this step-by-step is the big blue button under the Create Instance* section in the center panel labeled Launch Instance. Go ahead and click that bad boy:
Choose AMI
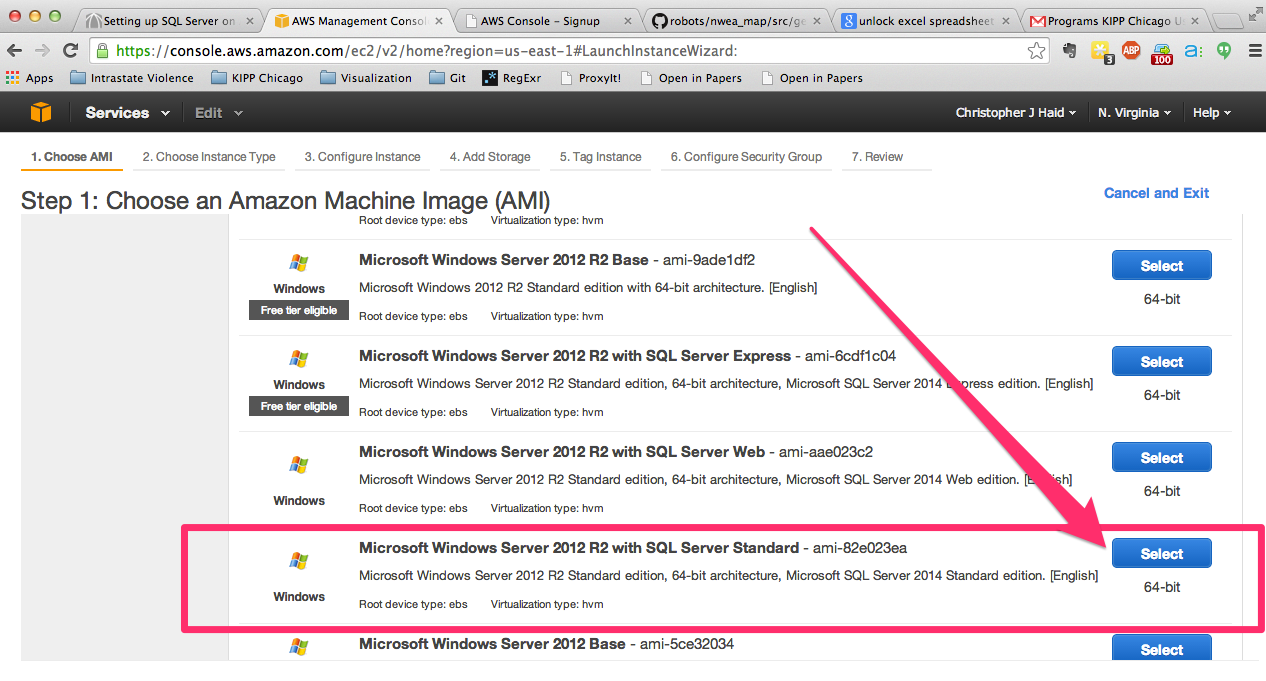
This is the screen where you will need to pick the Amazon Machine Image for the operating system (Microsoft Windows Server 2012 R2) already loaded with your copy of fully licensed database (SQL Server Standard). You’ll need to scroll down the page a bit to find the AMI you want:
- Microsoft Windows Server 2012 R2 with SQL Server Standard - ami-82e023ea
Choose Instance Type
«««< HEAD
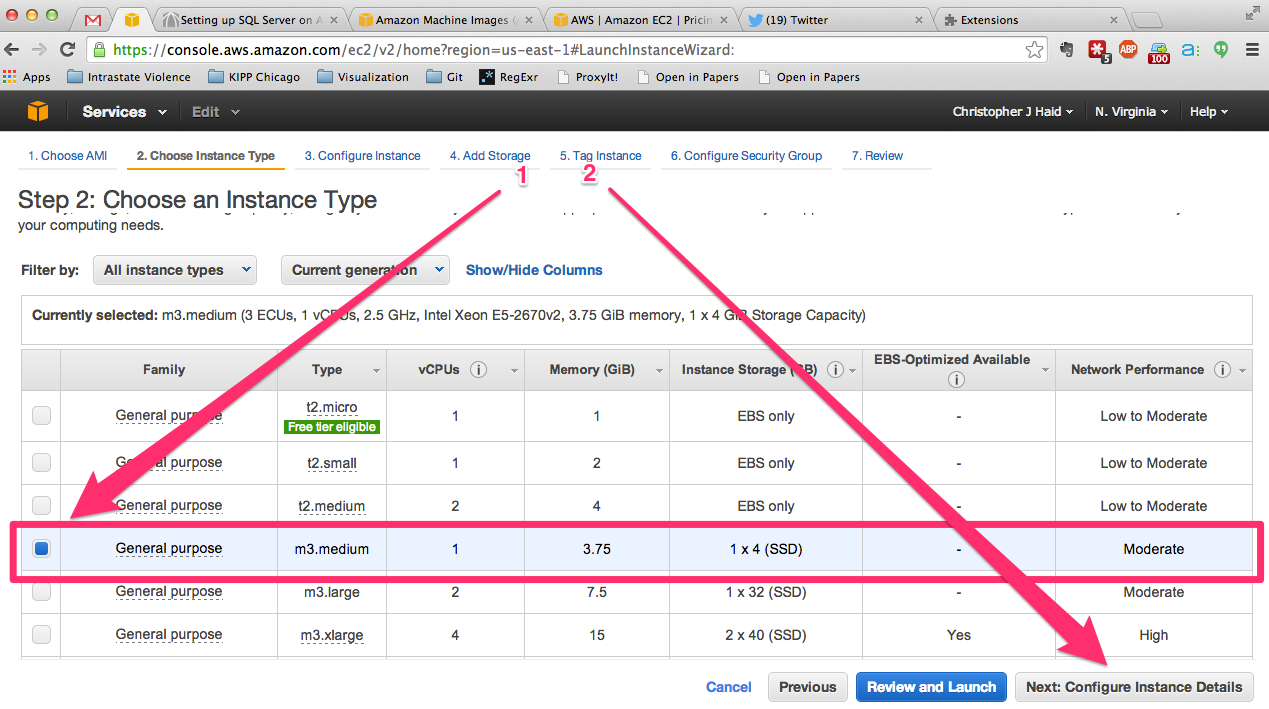
Here you pick your server size, configuration, and type. The cheapest you can buy from the on-demand instances (i.e., a pay-as-you-go plan) is the m3.medium that runs you $0.36/hour. You can drop that price in half to $0.16/hour by paying a little bit upfront ($1061) for a longer commitment (3-years). That’s only about $5,300 over three years (i.e., $1,764/year) to have your Silo data warehouse hosted in the cloud. Not to shabby given what your region is paying to ed tech companies to silo all of your data (ha! See what I did there).
=======
Here you pick your server size, configuration, and type. The cheapest you can buy from the on-demand instances (i.e., a pay-as-you-go plan) is the m3.medium that runs you $0.36/hour. You can drop that price in half to $0.16/hour by paying a little bit upfront ($1061) for a longer commitment (3-years). That’s only about $5,300 over three years (i.e., $1,764/year) to have your Silo data warehouse hosted in the cloud. Not to shabby given what your region is paying to ed tech companies to REMOVED all of your data (ha! See what I did there).
»»»> bfea0a51067761eafb8c837c1e2f779872c4b8fd
So choose the m3.medium instance and click the Next: Configure Instance Details button
Configure Instance Details
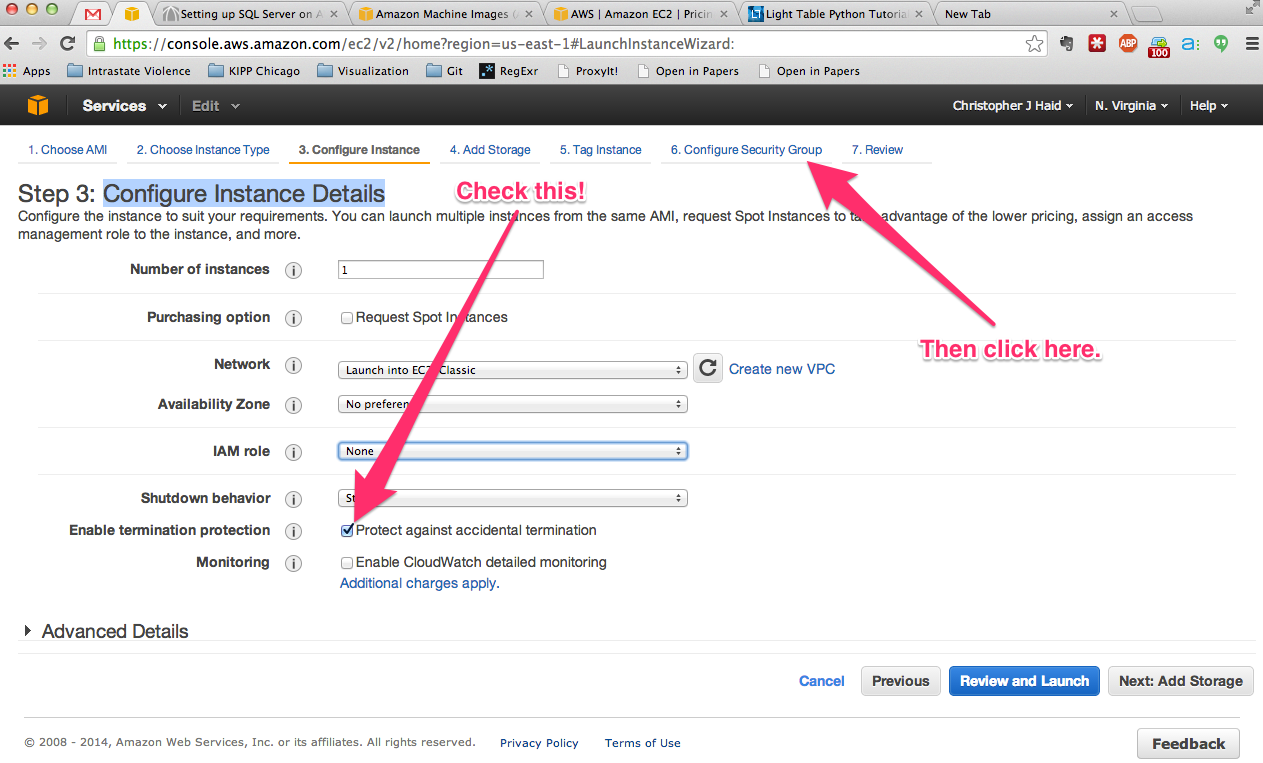
This will be quick and easy. You don’t need to change anything if you don’t want to. For the sake of safety, though, I like to check the Protect against accidental termination box. Why? Well terminating and instance kills it forever. In lieu of terminating an instance, we can stop the instance, which saves the state of the instance and shuts down the server (which can save you money). You can always restart a stopped instance, but terminated instances are gone forever. Whether you check that box or not, go ahead and click 6. Configure Security Group on the breadcrumb trail at the top of the page. (I’m skipping Add Storage and Tag Instance. You can continue through those steps if you want, as they are pretty self-explanatory, but the default storage should be sufficient and tags are cool but not necessary.)
Configure Security Group
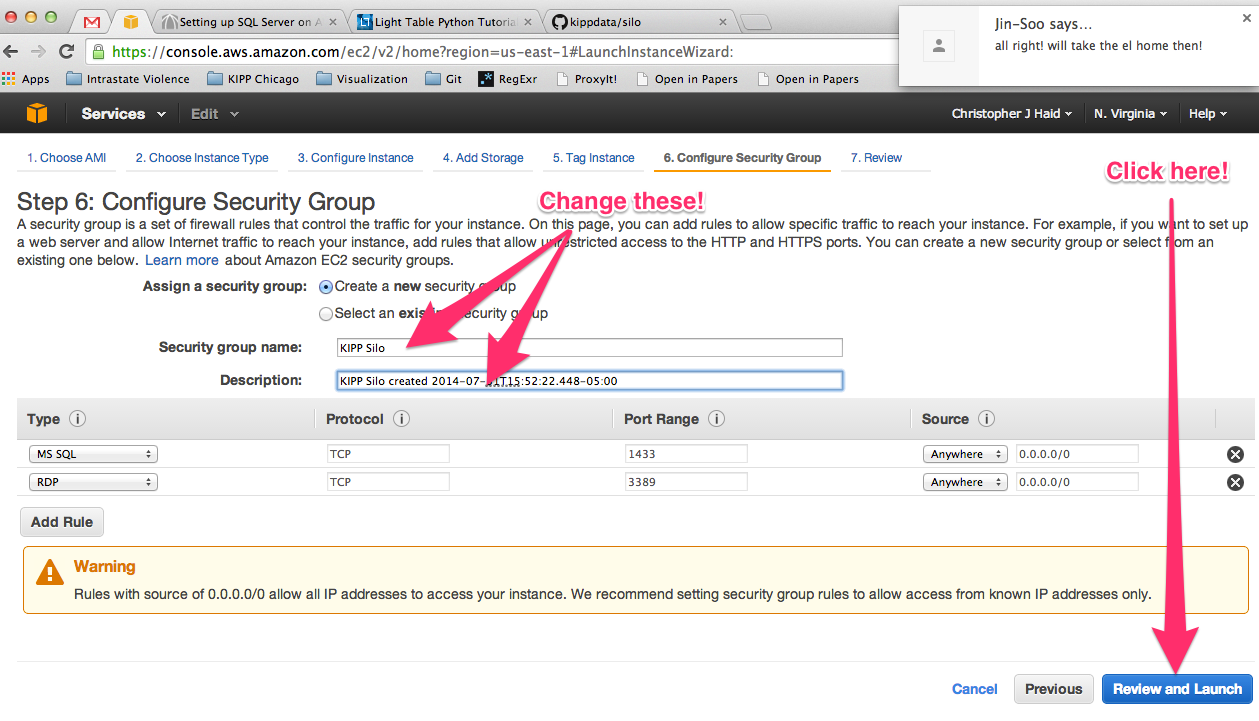
Here you can either create a new security group, which is essentially a set of rules for a firewall that secures which protocols, ports, and IP addresses will be able to access your Windows Server. The out of the box set-up should be sufficient for right now. You can rename the Security Group name to something memorable (how about KIPP Silo!). The click Review and Launch.
Launch Instance!
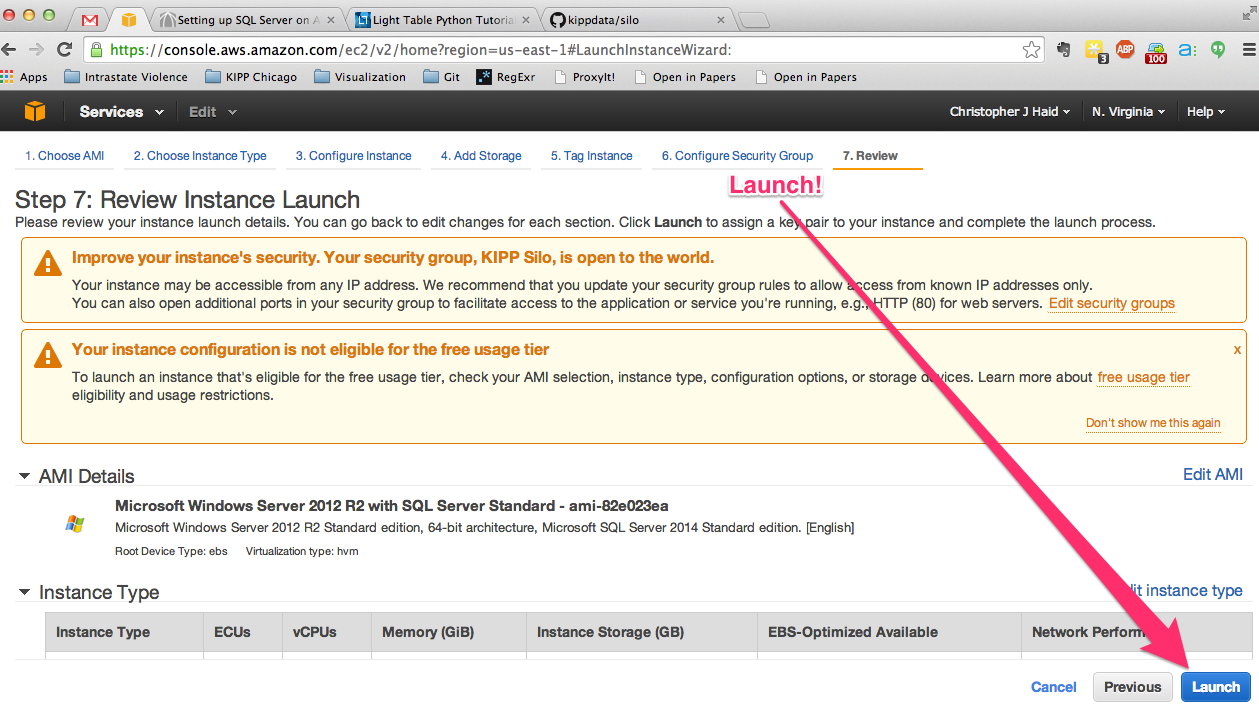
You’ll now be at the review and launch instance page. Sweet!
Key Pair
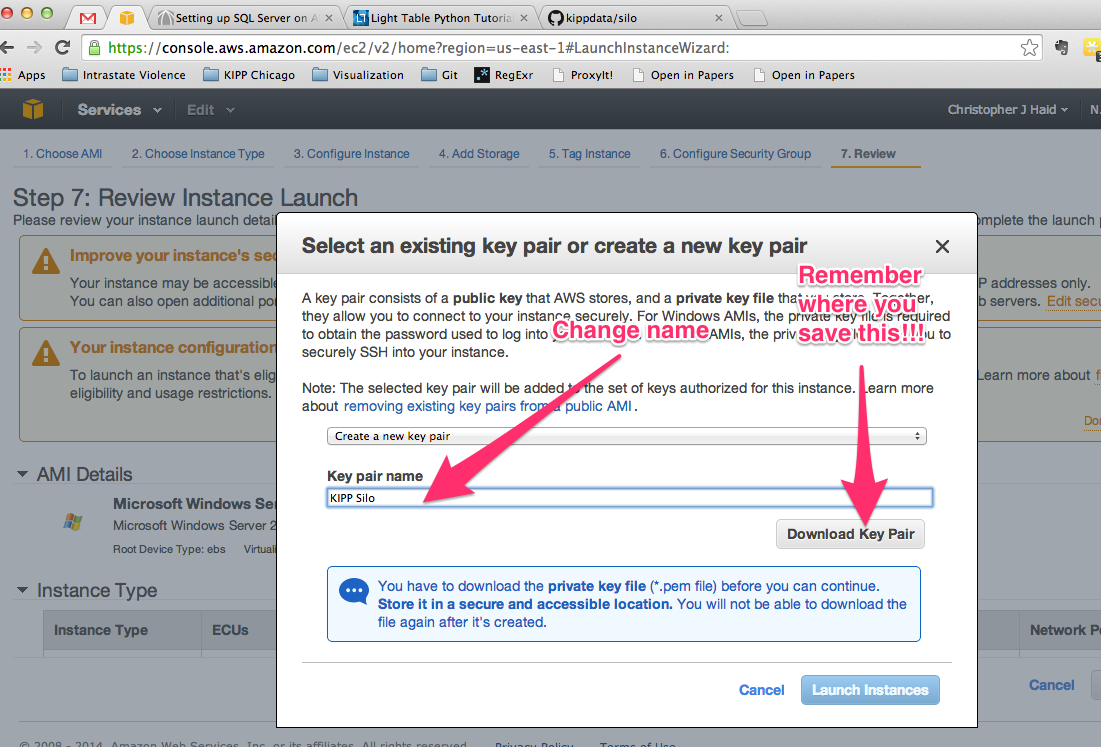
Before you launch completely, you’ll need to assign a key pair to the server. The key pair works just like keys do to your home or car. You must have possession of a special file (a key file) to access the server. Without the key you can’t access the server initially. Upon clicking “Launch” you should see a pop-up dialogue where you can either select an existing key pair if you already have or create a new key pair (AWS has one side of the key pair—called the public key—and you have the other side–called the private key or PEM file). Here I create a new key pair and name it KIPP Silo. You’ll download the key to your desktop/laptop, so please keep track of it and save it somewhere memorable.
Connect
Click on this link and follow the instructions provided to connect to the instance. AWS provides clear instructions on connecting to your instance for Windows, Mac, or Linux.
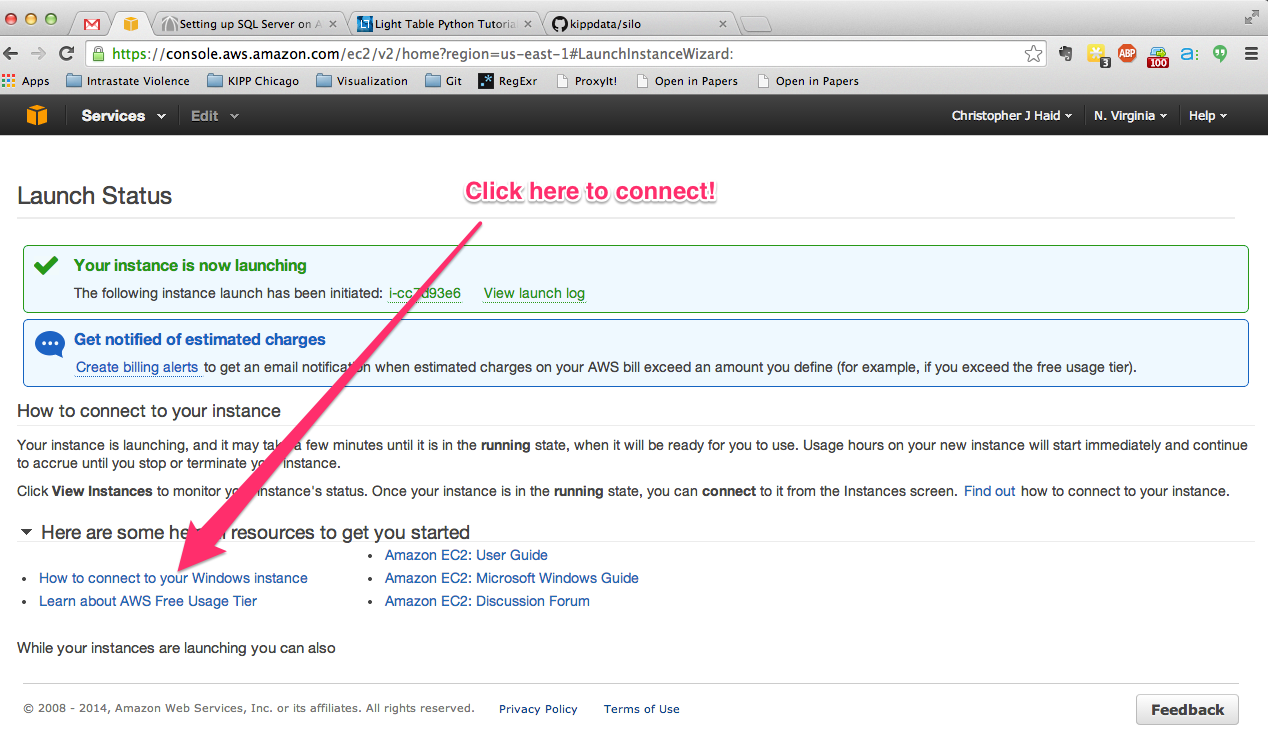
And that is it. You now have a server up and running with a database installed to boot.
This seems a all a bit overwhelming and maybe even a little scary, what should I do?
- Remember, that I’ve never done this before too, so it was a little scary for me. But I still go it done. AWS is super nice to the new user and provides plenty of attention.
- You can call/email/text me or Andrew or James or many other folks throughout the network.
- Do all of the above but in no risk format. You want to select an AMI running Windows Server with SQL Server Express on a micro instance. This set up, when used with a new account, is in the so called “Free usage tier”, meaning you have a year to use a very small instance with the lower powerd database FOR FREE.
It’s a playground. Fall down, get back up, no real risks. When you are comfortable, then follow these instructions for the SQL Server Standard edition.
Next Steps
In my next couple of posts, I’ll demonstrate how to launch in database instance (this will be your copy of KIPP Silo), how to set-up a persistent VPN connection to a Pearson-hosted PowerSchool instance, how to link your PowerSchool instance to the KIPP Silo SQL Server database, and how to link your Illuminate instance to your KIPP Silo SQL Server database.
Stay tuned!!!